Two tricks from one piece of glass
Hold a magnifying glass close to a page and the letters swell, the right way up. Hold it at arm’s length towards a window and you see the view outside, small and upside down. Hold it between a window and a sheet of paper, and a sharp, tiny, upside-down picture of the window appears on the paper. One lens, three different results. Which you get depends only on how far the object is from the lens.
Bending by shape
A lens is a piece of glass shaped so that refraction at its two curved faces bends light by different amounts at different heights. A converging lens is thicker in the middle. A ray crossing near its edge meets the surfaces at a steep slant and bends a lot; a ray through the centre barely bends at all. Rays arriving parallel to the axis are steered to cross at one point, the focal point, a distance f (the focal length) behind the lens. A diverging lens, thinner in the middle, spreads parallel rays out so that they seem to come from a focal point in front of it.
More curved surfaces bend harder and give a shorter focal length: a stronger lens.
Where the image forms
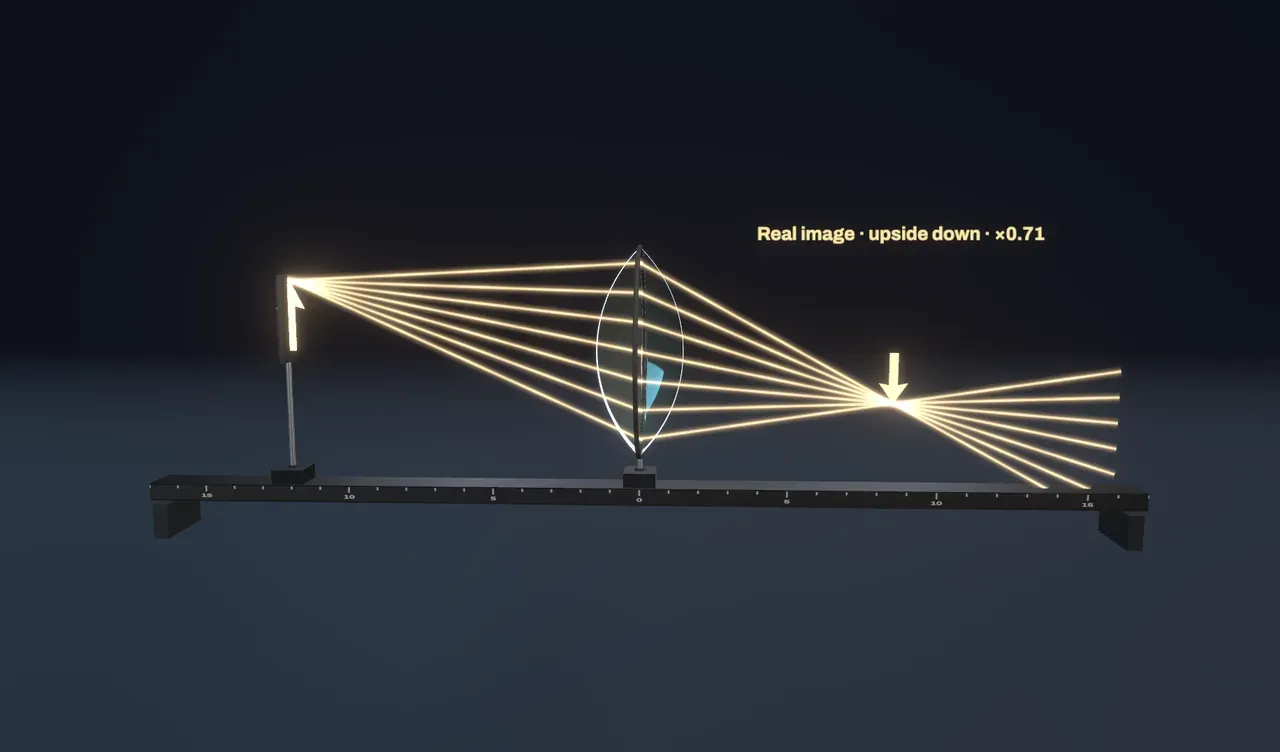
Every point of an object sends out light in all directions. The rays from one point that pass through a converging lens are bent so that they meet again at a single point beyond it. Where all those meeting points fall, a real image forms: put a screen there and the picture appears. The positions obey the thin-lens equation
1/f = 1/dₒ + 1/dᵢ,
where dₒ is the object’s distance from the lens and dᵢ the image’s. The image is larger or smaller by the magnification dᵢ / dₒ.
Try it: start at 15 cm, then drag Object distance slowly towards the lens. Watch the image grow and slide away until, at the focal length, it vanishes. Keep going down to 3 cm and choose On under Draw the rays.
Far away, the image is small, upside down and close to the focal point: that is how a camera or your eye works. At twice the focal length, it is the same size. Between one and two focal lengths it is bigger than the object, the arrangement inside a projector.
The magnifying glass
When the object sits closer than the focal length, the lens cannot bend its rays enough to meet. They leave still spreading, but less steeply, as if they came from a larger object farther back. Your eye cannot tell the difference, so you see an enlarged, upright virtual image: one no screen can catch, because the light never actually gathers there. A diverging lens always does this, giving a smaller upright image, which is why a door’s peephole shows a little wide-angle view of the corridor.
The ray diagram uses three easy rays. One arrives parallel to the axis and leaves through a focal point. One passes straight through the centre. One travels through the focal point on the near side and leaves parallel. Where they cross, or where their dashed backward extensions cross, is the image.
What this model leaves out
The scene’s lens is ideal: it bends each ray exactly as the thin-lens equation requires. A real lens with spherical surfaces focuses its edge rays a little short (spherical aberration) and bends blue more than red (chromatic aberration), so camera lenses combine several glasses to cancel these errors. A thick lens also needs its distances measured from points inside the glass, not its centre. Only rays from the arrow’s tip are drawn; every other point of the arrow sends rays to the matching point of the image.